


| Bookmark Name | Actions |
|---|
Ad Management
The campaigns are created based on numerous factors including the demographics and customer banking behavior. The customers will see an ad while using their respective banking site. The Spotlight users can manage this page based on the assigned role. They can create or edit a campaign or set a default campaign.
Ad Campaigns
The Ad Management page shows the campaigns which are active or have been active in the last 90 days.
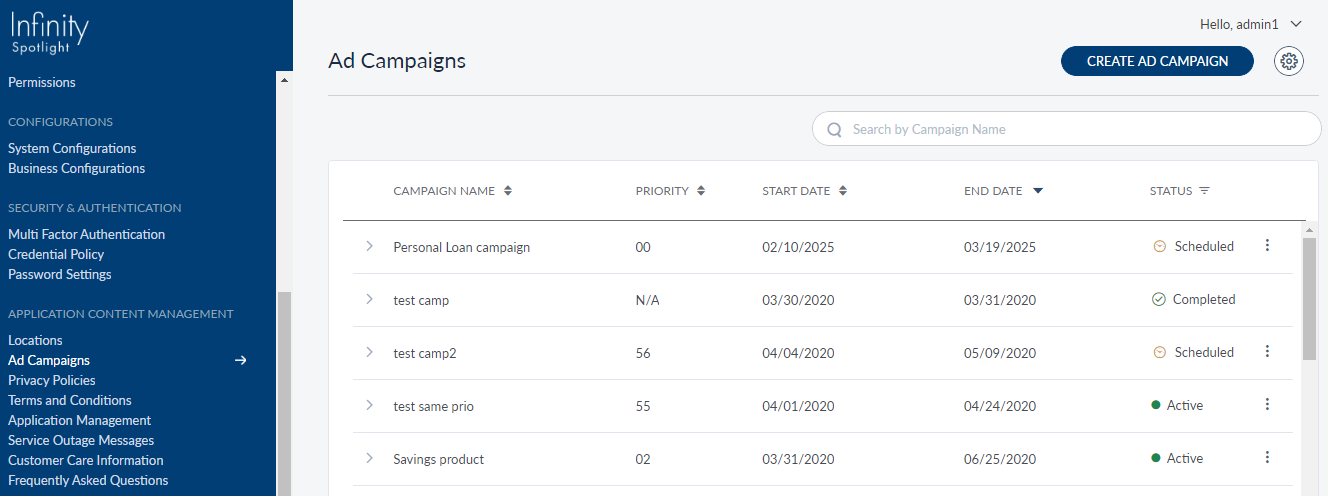
The following information is shown on the page:
- Campaign Name: Name of the campaign. The user can view the description under each campaign name by clicking the expand icon
 .
. - Priority: The priority of a campaign is represented in numeric. The user can edit the priority of a campaign.
- Start Date & Time: The day and time when the campaign has come into effect.
- End Date & Time: The day and time when the campaign will cease to be in effect.
- Status: The status of a campaign which is categorized into Scheduled, Paused, Terminated and Completed.
- Active: The campaign is active at the moment.
- Scheduled: The campaign to get active on the scheduled day.
- Paused: An active campaign is paused for the moment.
- Terminated: A campaign is stopped before its scheduled end time and no longer active.
- Completed: A campaign has completed its scheduled time and is no longer active.
You can edit the status of a campaign by selecting a status from the contextual menu.
You can click the sort  icon to re-arrange and view information from the categories mentioned earlier. Use the Search box to search for a campaign by providing the keywords.
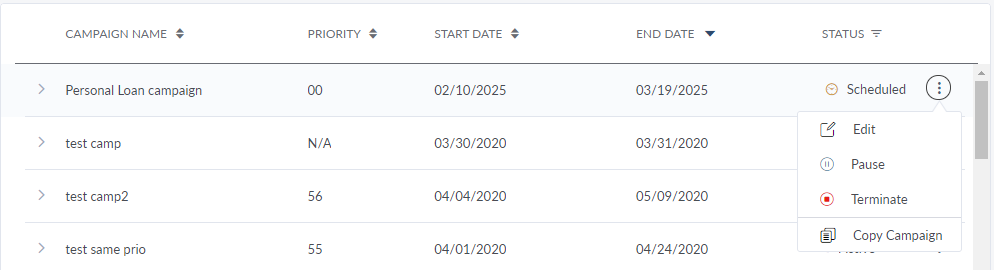
Contextual Menu
Using the contextual menu, you can edit, pause, terminate or copy a campaign. The options shown in the contextual menu are dependent on the status of an ad campaign. For example, if a campaign is paused, the options available for the user are Edit, Resume, Terminate, and Copy Campaign. The options available for active and scheduled campaigns as follow:
- Active - Pause, Terminate, and Copy Campaign
- Scheduled - Edit, Pause, Terminate, and Copy Campaign
NOTE:
- The contextual menu is not shown for Terminated and Complete campaigns.
- The process flow for the Copy Campaign option is similar to the edit and create campaign process.
It is shown only for those campaigns which are either active, scheduled or paused.
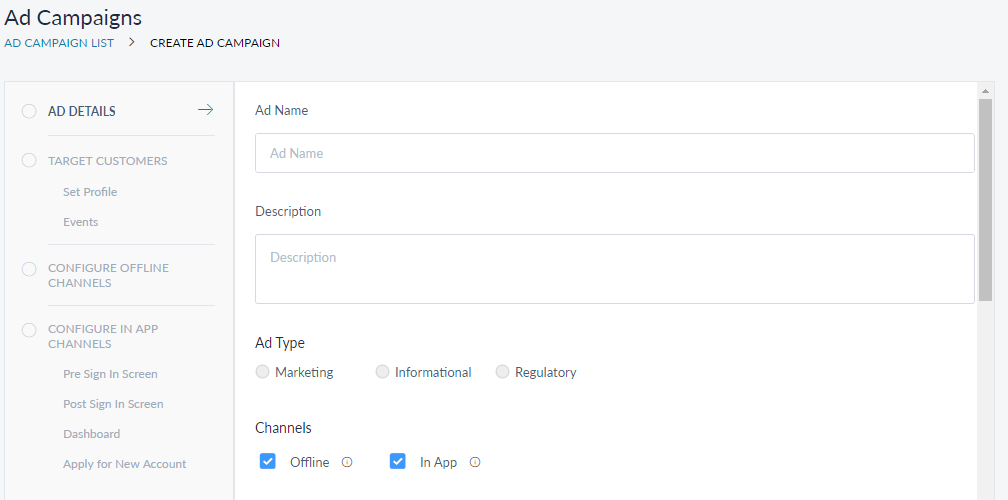
Create/Edit Ad Campaign
To create an ad campaign, click Create Ad Campaign button shown on the top-right of Ad Campaigns list page. You can edit an existing ad by selecting the Edit option from the Contextual menu () icon. For creating or editing a campaign, the user needs to provide information for three tabs: Ad Details, Target Customers, Configure Offline Channels (based on Channel selection), and Configure In App Channels (based on Channel selection).
- Ad Details - The user can provide/modify an ad name, description, priority, and the ad schedule.
- Ad Specifications - The user can provide a new image source URL, target URL, enable/disable ad display page, for a selected channel.
- Target Customers - Choose the target customers by selecting the customers grouped in different customer roles.
- Configure Offline Channels - You can choose the required offline channels and messages you want to send through them from here.
- Configure In App Channels - You can choose the required online channels, your ad location, ad banner and target URL from here.
Ad Details
This tab requires basic information of the ad campaign that is being created. It includes:
-
Ad Name - Give a name to the ad campaign.
-
Description - A brief explanation about the campaign within 150 words.
- Ad Type - It specifies the what kind of information you want to communicate with your target audience. Following are the different kind of information categories listed, select any one from them:
- Marketing - If you select this option, then you have to select the Product Group and the related Product Name which you want to market through the current campaign.
- Informational
- Regulatory
- Channels - Select any or both the channels through which you want to run the campaign. The options available are:
- Offline - SMS, Email and Push Notifications
- In App - It generally represents online channels like Mobile App and Desktop Web App.
-
Priority - Set a priority number to display a campaign. Two ads cannot be prioritized at the same time. Select View List to look at the ads listed with priority and set the priority for your ad accordingly.
Priority Conflict Message pop-up
- Date Scheduled for Ad - Set the start and end date for the ad campaign.
Target Customers
Here you can personalize the ad campaign designed for a specific customer base based on their demographics and other attributes from the Target Customers tab.
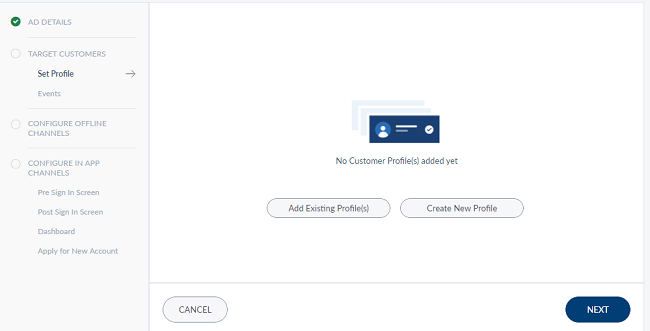
This tab contains two sections:
- Set Profile - You can define the conditions to filter your analytical data to get your target customers. It is optional.
- Events - Events are like placeholders where you place the Ad. These events are based on the actions performed by the customer in the application or any automated actions taken by the bank on the customers account. It is mandatory.
By default the Set Profile section is displayed.
Set Profile (Optional)
Select the Create New Profile button to get started with creating a new role. You need to repeat the process if you are creating multiple profiles. If a role was created already, it will be listed in the tab.
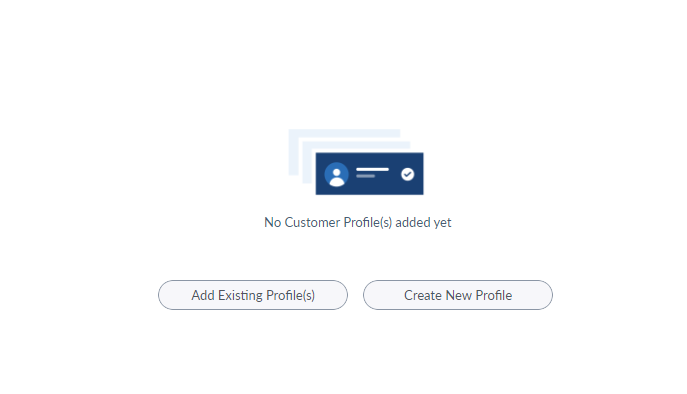
You can do the following from here:
-
Create New Profile – Create a new profile by selecting the various attributes for a focused customer base. The Create New Profile screen appears.
-
Add Existing Profile(s) – Add the existing customer roles. These include default as well as created roles which are already present.
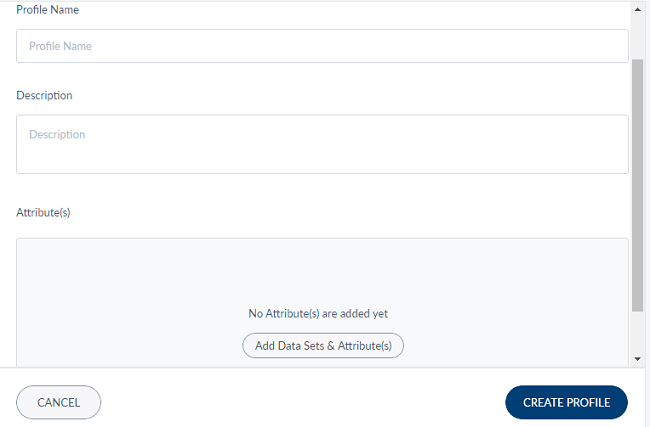
Create New Profile
You can do the following in Create New Profile screen:
- Profile Name - Provide a name to the profile that you are creating.
- Description - Add a description for the new profile. The word limit is 300.
- Attributes - Click the Add Data Sets and Attribute(s) button to choose the qualities/conditions for targeting customers. The Add Data Sets and Attribute(s) screen is displayed. It contains the following information:
- Select Data Set - This pane displays the available data sets. You can click on the checkbox to select data set(s) based on the target customer base for your campaign.
- Attributes - Based on the select data set, the attributes are displayed in the left pane. You can set the Criteria and Value for each attribute. For instance, if it targeted for the married, age group, and banking products/instruments. These details will help in creating specific customers resulting a higher probability of conversions. To add more new attributes or data context, refer to Add Data Context or Attributes section.
- Click Save. The new profile is added in the Set Profile tab.
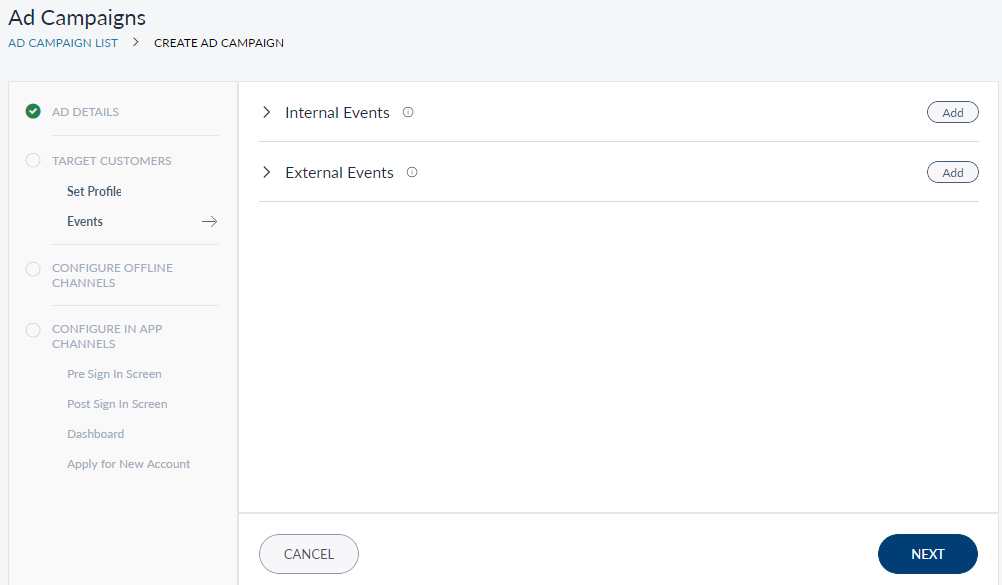
Events
There are two types of events in the Events tab. These determine the location where you want the customers to view the Ad.
- Internal Events - Actions performed by the target audience on the application are call Internal Events. Based on the selection made here, the target audience can view the Ad once the selected event is executed. The available internal events are as follows:
- Phone Update
- Pre Login
- Post Login
- Account Dashboard
- Apply New Account
- External Events - The actions that occur outside the application like auto EMI debit, credit transactions and more are called External events. When you select an external event, the confirmation mails you receive from the bank related to the selected event will contain the Ad. The available external events are as follows:
- Surplus Funds
- Overdrawn Account
- Mature Deposit
NOTE:
- It is not possible to remove a certain ad placeholder from a campaign once it has been added. For example, if a user creates a campaign for both mobile and web account dashboard and later wants to display it only for web and not mobile, the user will not be able to do that. The campaign needs to be terminated and created once again with the new requirements.
- Editing an ad campaign involves similar activities and user flow of creating an ad.
- You must provide the data for all the tabs in the chronological order to create or edit an ad.
Configure Offline Channels
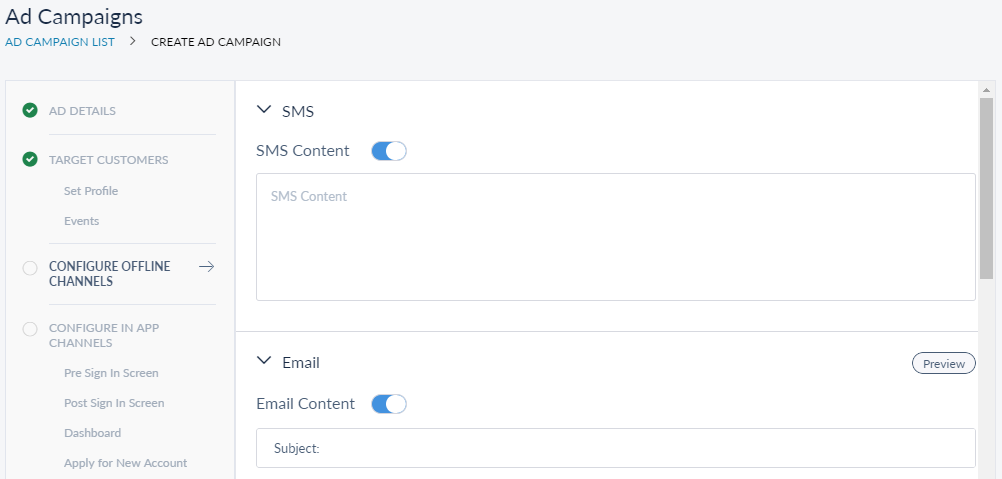
If the offline mode was selected while adding the Ad Details, the Configure Offline Channels tab is displayed. You can configure the different offline channels for carrying out your campaign from here. By default all the channels are enabled, you can disable the required channel with the help of respective toggle. The offline channels available are as follows:
- SMS
- Email - Provide the Subject and Email content in the respective fields.
- Push Notifications
Configure In App Channel
This tab specifies the locations for the ad to be shown to the customers in the different channels. The locations include:
-
Pre Login Screen
-
Post Login Screen
-
Dashboard
-
Apply for New Account.
You can choose the locations for the ad to be shown. Disable the Display Ads toggle to skip a location. The user can verify the links provided by clicking the option and previewing the created/modified page.
Target URL - Provide the link where you want the target audience to navigate when they click the ad.

Verify - Click Verify to preview the ad.

NOTE: You can choose the locations for the ad to be shown. Disable the Display Ads toggle to skip a location.
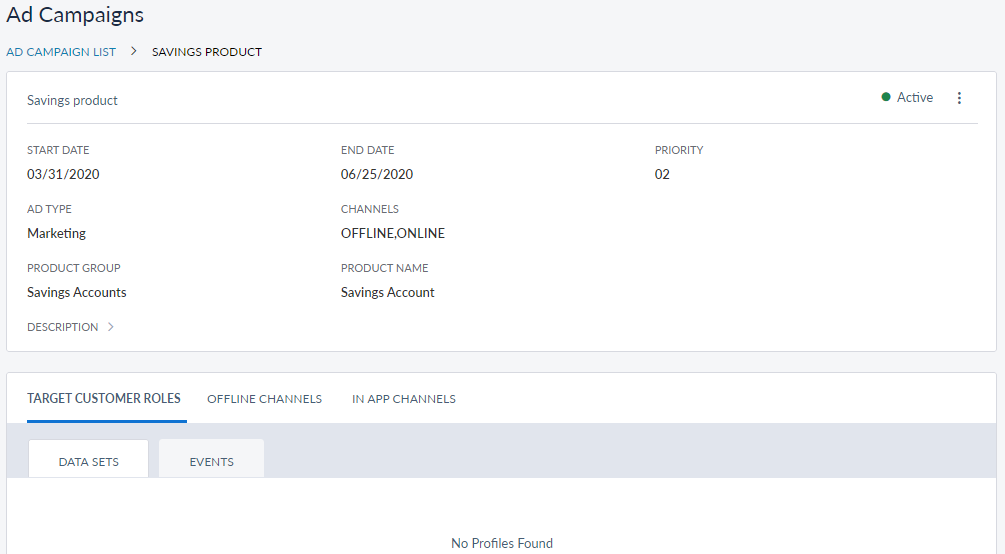
View a Campaign
Path: Ad Campaign List > Selected ad
Select any listed campaign to view all the details related to it. The details include both general and specific. The general information comprises the start and end dates, priority and description. Specific details are shown channel-wise.
In App Channels
The In App Channels tab include the following information:
-
Channel names - Native Mobile App, Native Tablet App, Web App – on the campaign will be shown.
-
Ad display page – the location of the ad – Pre Login Screen, Account Dashboard or Post Login Full Screen Interstitial Ad - on the banking site.
-
Image Source URL – It is the URL of the image shown for the ad. The user is required to provide the same image in the mentioned specifications to render them correctly on all devices.
-
Target URL – This link directs the customers to the web page where additional information is provided about the ad. This is an optional field.
View Target Customer Roles
The Target Customer Roles tab on the ad details page displays the list of customer roles that are being targeted for an ad.

The Target Customer Roles tab contains the following subtabs:
- Data Sets - It contains predefined set of rules to filter the analytical data available with respective bank to get the target audience for the campaign. Click View to see the attributes and conditions defined for the respective data set.
- Events - It lists all the Internal and External events selected for the campaign while creating it.
Offline Channels
If the offline mode was selected while creating the campaign, the Offline Channels tab displays the list of offline channels selected for the campaign. The offline channels available are as follows:
- SMS - Displays the message sent through SMS to the intended target audience.
- Email - Displays the Subject and message sent through Email to the intended target audience. You can click Preview to view the structure of the mail sent.
- Push Notification - Displays the message sent through push notifications to the intended target audience.
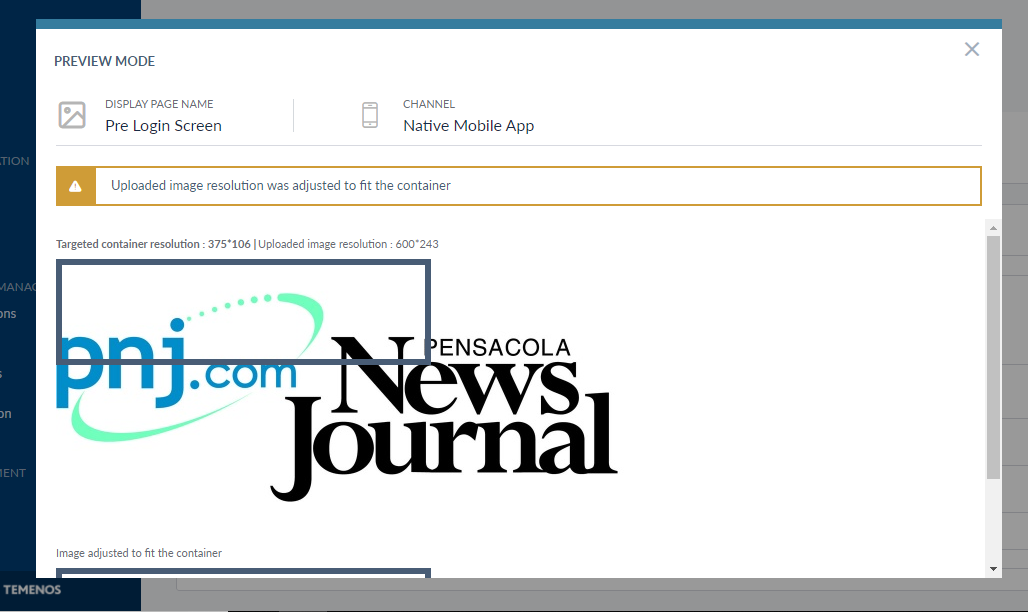
Preview Ad/Campaign
User can preview the campaign by clicking an image URL link displayed for each channel section. The channel name, ad display page name, image resolution and image format are shown on the page. The image placeholder provided on the page helps the user to upload an image with the correct size.
Miscellaneous 
From the Settings option shown on the top-right of Ad Campaigns page, you can perform the following activities:
-
Set Default Ad Campaign - you can set an ad campaign that is applied to all customers.
-
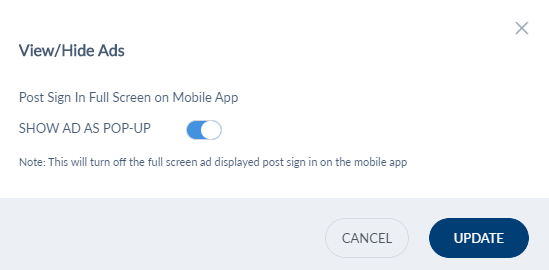
Settings - You can choose to show ad pop-ups post logging into a banking an application.
Default Ad Campaign
The Default Ad Campaign does not apply to any specific target customer group and can be applied to all customers groups. This feature can be used when there is no customized ad campaign for a specific group. The users can neither modify or disable a default ad campaign. They can only preview it.
It is mandatory to have a default campaign as custom campaigns can be created and scheduled only if a default campaign is available.

Settings
You can choose to enable or disable full-screen ad after logging into a mobile banking app.
Add New Data Context or Attribute
Following these steps you can add a new data context or add new attribute(s) for existing data context. This data context(s) is used to create a profile for any campaign which will get customers for the campaign. The steps are as follows:
- In the Model table in DBX DB. provide the model information like ID, Name and endpoint_url.
- In the attributes table in DBX DB, provide the details about each attribute. The details are as follows:
- ID : Unique ID of attributes.
- endpoint_attribute_id : Provide the Attribute key as available in query dataset. For example, as highlighted in following screenshot:

- name : The name of the attribute that you want to be display in UI.
- attributeType : Add the type of attribute. It can be SELECT, NUMERIC, ALPHABETICAL.
- Options : This is applicable only for SELECT attributeType. This should be in a JSON array format. The Key will be values obtaining while querying dataset. Value is the i18n property that is displayed in the UI as highlighted in the following screenshot:

Sample JSON array for Options in DB:
[{"02. < 19": "i18n.frmAdManagement.02_to19"},{"03. 19 - 24": "i18n.frmAdManagement.03_19to24"},{"04. 25 - 34":"i18n.frmAdManagement.04_25to34"},{"05. 35 - 44":"i18n.frmAdManagement.05_35to44"},{"06. 45 - 54":"i18n.frmAdManagement.06_45to54"}] - Range : Applicable only for NUMERIC attribute type. Min expected value can be given here.
- Critetias : Provide the required JSON array. For example:
[{"eq":"i18n.frmAdManagement.Equal"},{"ne":"i18n.frmAdManagement.NotEqual"},{"gt":"i18n.frmAdManagement.GreaterThan"},{"ge":"i18n.frmAdManagement.GreaterThanOrEqual"},{"lt":"i18n.frmAdManagement.LessThan"},{"le":"i18n.frmAdManagement.LessThanOrEqual"}] - Helptext : Any text you want to display along with attribute name. This will be displayed in brackets beside the attribute name.
- Map these attributes to the model in modelattribute table of DBX DB.
NOTE: Please make sure that a datacontext with same ID as model ID is available in Microservices.
Experience APIs
The list of products and their related information is retrieved from Marketing Catalog Micro Service. The experience APIs that connect the Spotlight application with the micro service are as follows:
| Experience API | Connected Micro - service URL |
|---|---|
| getProductGroupsByProductLine | http://13.76.33.216:9095/ms-marketingcatalog-api/api/v1.0.0/product/productLine/$PRODUCT_LINE/productGroup |
| GetAllProductGroups | http://13.76.33.216:9095/ms-marketingcatalog-api/api/v1.0.0/product/productLine/$productLine/productGroup/ |
| getProductsByProductGroup | http://13.76.33.216:9095/ms-marketingcatalog-api/api/v1.0.0/product/productGroups/$PRODUCT_GROUP |
|
(Campaign Engine) |
<MicroServiceHost>/ms-campaign-api/api/v1.0.0/campaignmanagement/eventtriggers/<EventCODE>/campaigns <MicroServiceHost>/ms-campaign-api/api/v1.0.0/campaignmanagement/campaigns/defaultcampaigndetails?channelsubtype=<channel>&imagescale=<scale>&placeholderidentifier=<placeholderCode> |
| getPreLoginCampaigns |
<MicroServiceHost>/ms-campaign-api/api/v1.0.0/campaignmanagement/eventtriggers/<EventCODE>/campaigns <MicroServiceHost>/ms-campaign-api/api/v1.0.0/campaignmanagement/campaigns/defaultcampaigndetails?channelsubtype=<channel>&imagescale=<scale>&placeholderidentifier=<placeholderCode> |
| pushExternalEvent | None |
| getPlaceholders | <HOSTURL> /ms-campaign-api/api/v1.0.0/campaignmanagement/placeholders |
| getEvents | <HOST-URL>/ /ms-campaign-api/api/v1.0.0/campaignmanagement/eventtriggers |
|
(Campaign Designer) |
<HOST-URL>/ ms-campaign-api/api/v1.0.0/campaignmanagement/campaigns |
| createCampaign | <HOST-URL> /ms-campaign-api/api/v1.0.0/campaignmanagement/campaigns |
| updateCampaign | <HOST-URL> /ms-campaign-api/api/v1.0.0/campaignmanagement/campaigns/<CAMPAIGN-ID> |
| getProfiles | <HOST-URL>/ ms-campaign-api/api/v1.0.0/campaignmanagement/profiles |
| createProfile | <HOST_URL> /ms-campaign-api/api/v1.0.0/campaignmanagement/profiles/ |
| getAllDefaultCampaigns | <HOST-URL> /campaignmanagement/campaigns/defaultcampaigndetails |
| updateDefaultCampaigns | <HOST-URL> /campaignmanagement/onlinecontent/defaultcampaigndetails |
Click on the respective API to know more about the API.
Add Bookmark
save your best linksView Bookmarks
Visit your best links BACK
BACK


Are you sure you want to log-off?